Guide: Test new releases without harming your existing installation
Try any distro: Step by step
Virtualisation doesn't have to be scary. It isn't the sole domain of the enterprise, or cloud computing, or server farms. It's just as useful, and just as manageable, as the average desktop, and there now seem to be almost as many ways to virtualise Linux as their are distributions themselves.
You could pay money, for example, and buy a workstation product from either VMware or Parallels, both of which have excellent performance, support and some advanced features. Or you could try their open source equivalents, the wonderful VirtualBox and Qemu.
 We used the command line to install KVM, but you may find it easier to try the Add/Remove software app first
But there's another alternative, and it can offer the most transparent virtualisation integration into your current configuration, making it an ideal way to experiment with new distributions, and put them to the test.
This is KVM, the kernel-based virtual machine. These three letters might once have scared you off with stories of complexity and VNC sessions, but thanks to a wonderful Red Hat project called Virt-Manager, almost anyone with the right hardware can install KVM and get their own virtual machines running in no time at all.
And virtual machines really are the best way to experiment with the plethora of Linux distributions there are on offer. They're non-destructive, easy to set up, and almost as fast as the real thing to use. They're the best way to get a feel for a distribution without committing real hardware to the installation process, and virtualisation enables you to race through as many installations as your broadband connection allows.
And like all great journeys, it starts with the first step…
Step 1: Check your hardware compatibility
Before we go any further, you need to make sure that your system is up to the task of running other operating systems within a virtual machine. As a general rule, any machine from the last three years should work, but there are some system specifics you should look for.
 Most importantly, your CPU should offer what's known as a processor extension for virtualisation. All the modern virtualisation solutions use this to dramatically enhance the performance of the virtualised machine, although older applications such as VMware Player will still work if you don't happen to have a CPU with the correct extension.
Which extension you should look for depends on which brand of processor you're using. Intel users should look for VT-x, while AMD users should look for AMD-V, for example.
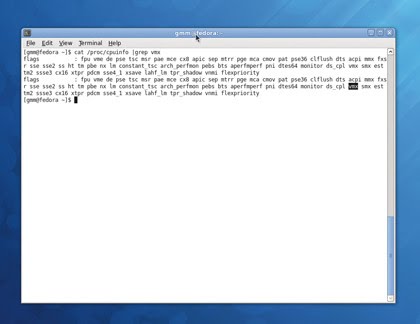
You can check your CPU for compatibility by opening a terminal and typing cat/proc/cpuinfo. This will list everything, and if you've got more than one core, more than one processor, or hyperthreading enabled, you see the list repeated for every instance.
Just make sure there's either a vmx or an svm entry in the flags section for any of these cores. The former is Intel's name for the virtualisation extension, while the latter is AMD's equivalent.
Fiddle with the BIOS
If neither appears and you think your machine should be capable, then virtualisation may be turned off in your system BIOS. Getting into the BIOS involves restarting your screen and pressing a specific key as your system's post messages appear, before the Grub menu. This key is usually Delete, F2 or, occasionally, F10.
The location of the setting is also dependent on your specific BIOS, but you should find the entry under either an Integrated Peripherals section, or within the Security menus.
Finally, you'll need to make sure you have enough storage space and memory. A virtual machine eats real resources, which means you'll need to allocate memory and storage space to each virtual instance while leaving enough over for your native operating system.
Linux distributions generally work well with between 512MB and 1GB of memory assigned to them, so you'll ideally need 1GB as a minimum, and ideally, 2GB or more.
It's the same with storage. A standard installation normally takes around 5GB as a minimum (depending on the distribution of course; if you're running a mini-distro such as Puppy Linux you'll need less than this), but if you're going to use a virtual machine for real work, you'll need to allocate more space.
Step 2: Use the right base distribution
We've chosen Fedora 12 because it has the best implementation of Virt-Manager, and there's no reason to doubt that Fedora 13 will be equally as adept.
Fedora is easy to install and provides a top-class distribution. Virt-Manager is the application used to manage both Xen and KVM virtual machines on your system, and without it, these instructions would be a lot harder to follow.
 This is because Virt-Manager turns what can be a very complicated setup procedure into a few simple clicks of the mouse. If you've ever created a virtual machine with the commercial VMware or Parallels Workstation, you'll find the job just as easy with Virt-Manager.
 The discovery that Fedora is the best distribution to use if you want to play with Virt-Manager is no surprise considering it was developed by Red Hat, but what is surprising is that there aren't more distributions taking this open source project and making it an integral part of their virtualisation strategy, because recent versions of the application are so good.
Even Ubuntu, a distribution which has thrown its cards in with KVM as part of its campaign to push cloud computing with Eucalyptus, only manages to bundle an older version of Virt-Manager in its package repositories, and this older version is severely crippled in terms of features and usability.
Hopefully, the imminent 10.04 should address this problem, and Ubuntu users will soon be able to install a recent version of Virt-Manager without too much difficulty.
Step 3: Install the virtualisation software
The hardest step in the whole of this process is probably installing the specific packages required for virtualisation, simply because you get the best results from the commandline, which many people seem to be naturally allergic to.
But don't let that put you off if you've never used it before – we're only entering a line or two of text, and it shouldn't cause any problems. It's just the way Fedora works best.
 Quite a few packages are required to get virtualisation up and running with a default Fedora 12 installation. You could use the package manger, launched by clicking on Add/ Remove Software within the System > Administration menu, but we had trouble tracking down the KVM package, and had better luck using Yum on the command line.
 From the command line, launched from the Applications -> System Tools menu, type su followed by your user password. To install packages, type yum install followed by the packages you wish to install.
Here's the line we used: yum install kvm virt-manager libvirt
You should find that there are plenty of other packages that need to be installed as dependencies, and these will be grabbed automatically.
After installation, you can either restart your system or type /etc/init.d/libvirtd start (or use the service command) to start the virtualisation management process.
After that, you're ready to dive into the Virt-Manager application.
Step 4: Fire up Virt-Manager
Virt-Manager can be found by clicking on System Tools > Virtual Machine Manager. You'll need to enter your root password to be able to use the application, but there isn't much to see when it first runs. There should be just a single connection listed in the main window as 'localhost (Qemu)'.
In Virt-Manager terminology, a connection allows it to manage the virtualisation, and they can be on remote machines as well as local. Localhost is your current machine, and Qemu is the virtualisation technology that the connection is using.
 The reason why Qemu is listed instead of KVM is because KVM needs Qemu to provide access to the standard emulation elements required to run a virtual machine, such as the BIOS emulation. Qemu then uses KVM to access the virtualised parts.
If it doesn't appear on the list, or if you want to create a new connection, click on Add Connection from the File menu and choose Qemu/KVM from the drop-down Hypervisor list. You could also choose Xen if it's installed and you feel like experimenting with a different technology.
With older versions of Virt-Manager, you would now have to manually create a shared storage device by right-clicking on the connection and choosing the storage device. New versions handle this automatically from the instance-creation wizard, which is the next step.
Step 5: Create a new virtual machine
Click on the Play icon in the top-left, then give your creation a name. If you'll be running several different distributions, it's a good idea to name the virtual machine after the distribution you'll be running. Also, make sure you select Local Install Media, as this is how we're going to install the distribution.
On the following screen, select Use ISO Image and use the Browse button to navigate to the location of your ISO. You'll have to click on the Browse Local button to jump from the virtual storage to your home directory.
 Virtual storage is the space that Virt-Manager uses to store its own virtual drives. Choose Linux as the OS Type in the drop-down menu below the ISO location. To ensure the best possible compatibility, try to choose a distribution with the closest match to the distro you want to try. For distributions like Mint or Crunchbang, for example, you could select Ubuntu 9.10.
 On the next page, you need to select how much RAM you want to assign to the virtual machine. Minimal distributions like Dreamlinux could get away with 512MB or lower, but a modern Gnome or KDE-based distribution would ideally need 768MB and higher. The more memory your virtual machine has, the better it will perform.
Finally, on the next page, make sure to select Enable Storage, and click on Create A Disk Image. If you've got enough disk space, increase 8GB accordingly. Leave the final page at its default settings and click on Finish.
Step 6: Boot your new distribution
After clicking on Finish you'll find that Virt-Manager spontaneously launches into the boot process for your chosen distribution. A few moments after that, you will see exactly the same boot routine you'd expect if you were booting off a real drive with a physical disk. This all means that everything is working exactly as it should, and you've been able to successfully create and run your first virtual machine.
What happens next depends completely on the distribution you've chosen to run. Linux Mint, for example, will present a fully functional desktop, whereas other distributions may ask you to walk through the installation routine. Either way, you can get full control of the virtual machine by clicking within the window.
 KVM will then take over your mouse and keyboard. You should see a small notification window telling you that the pointer has been grabbed and letting you know the key combination you need to use if you want to escape from your virtual machine back to the native environment.
 This key combination is normally the left Ctrl and Alt keys, which has become something of a standard with virtualisation software. Pressing these together should give control back to your normal desktop.
If you ever need to send this specific key combination to the virtual machine you can use the Send Key menu, which lists all the various combinations you might want to use, such as Ctrl+Alt+F1 for the first virtual console view, or Ctrl+Alt+Backspace to restart the X server.
Try any distro: Get more from Virt-Manager
Because there aren't any buttons on the front of your virtual machine's beige box, you have to shut down, restart and power off your virtual machine from within the software. These functions can be found by either right-clicking on the running machine, or from the drop-down menu in the toolbar. Depending on the virtualised distribution, both shutdown and restart options should be safe to use.
This is because KVM sends the request to the virtual operating system, and this should handle it in exactly the same way as it would the same option being selected from the shutdown menu in Gnome, or a quick press of the power button in a system that responds correctly to ACPI messages. This means that you'll be warned of the impending shutdown and you'll have a chance to respond to any applications that are still open and save any files.
This won't happen if you choose 'Force Off' from the shutdown menu, as this is the virtual equivalent to pulling the power cable out of the wall. In this case, anything that's not saved to the virtual storage device will be lost.
You may also have noticed a Pause button in the Virt-Manager toolbar. This will instantly stop the virtual machine, which can be resumed from the same point by pressing the Pause button again. But unlike the same functionality in VMware, a paused system will not survive a reboot and you'll lose data held in running applications that haven't saved their state.
Danger – virtualisation ahead
Another important thing to realise is that just because your data is virtual and that there's no power cable to each machine, your work is even more fragile within a virtual environment than it is on your normal desktop. This is because there are more things that can go wrong, and your data is usually harder to get at should you wish to restore it.
It isn't a problem if you manage your data appropriately, but it's something you should be aware of if you start spending a lot of time within a virtual machine.
After running the virtual machine for the first time, you may wonder how you change the disc image to point to another ISO file, or even get back to the same information you saw when you first ran the machine. This configuration panel is accessed from the view panel of the virtual machine you wish to change, and you need to make sure that the machine isn't running to be able to change settings safely.
Just click on View -> Details to enter the editor. You will then see a window that offers a comprehensive overview of the virtual hardware being emulated for your machine. Click on IDE CDROM 1, for example, followed by Connect on the panel to the right, and you'll be able to select a new CD/DVD image for your virtual machine. Click on Memory and you can adjust the amount of memory assigned to the machine.
This is handy if you either under-or overestimated how your virtual machine might perform when you ran through the startup wizard.
Check your hardware
You might also want to look at the graphics hardware being emulated. This is found on the Display page, and by default, it's something called 'cirrus'.
The Cirrus Logic chipset that this emulates is one of the most common and broadly compatible chipsets available, with excellent support across a wide range of operating systems. It's perfect for running old distros, MS DOS and even Windows, for example, but it's not the fastest driver, and if you're going to be spending a lot of time in your virtual distribution, it might be worth switching to 'vmvga' in the model list.
This is a close match for VMware's own graphics driver, and is better suited to virtualisation. If your virtualised distribution is able to use an implementation of VMware's open source graphics driver, you should find this option performs better on your system. If not, you can always switch back.
Recent versions of Virt-Manger can also be made to scale the resolution of the virtual machine's display to the size of the window. Just enable the Scale To Display > Always option in the View menu. If you have a virtual screen resolution higher than your host machine's, you will need enable this option or you'll have to manually scroll around the display, which could get a bit wearing.
Another neat function is that your virtual machines are also available through VNC, the remote desktop protocol. To get started with this, take a look at the Display VNC page in the settings viewer.
When your virtual machine is running, you'll see a port listed for the service. You will then be able to access the desktop of your virtual machine using a VNC client, such as Vinagre on Gnome or KFM on KDE. For a client running on the same machine, just point it at localhost:5900 for the first virtual machine. Change the port number to the one listed in the details view if this doesn't work, and you'll see the same desktop session displayed within the Virt- Manager virtual machine view.
This has all kinds of potential uses, from accessing your virtual machines from a remote computer somewhere out in the wilds of the internet to duplicating the desktop for use as a live demonstration with a projector.
Advanced features
You might also have guessed from the Virt-Manager GUI design that you can run as many separate virtual machines as your system will allow. The only real limitation is physical memory, because this is likely to be the weakest link in your system.
When each machine is running simultaneously, you will need enough memory to cater to the specific requirement of each. With 4GB of RAM, for instance, you can run three virtual machines alongside your normal desktop if each were given 1GB of RAM, and you can check the performance of each instance using the CPU meter to the right of each entry in the virtual machine list.
If you need more information on each machine's memory usage, disk throughput and network bandwidth, take a look at the Performance page of the Details window. One of KVM's more advanced features is its ability to access your real hardware through the Physical Host Device functionality.
But before you set your expectations too high, this doesn't mean you can pass your latest high-powered Nvidia graphics card or audio device through to the virtual machine – these are far too complex to work. But you should be able to get most network adaptors to function as well as many USB storage devices.
To get these to work, open the Details window from the virtual machine view and click on the Add Hardware button at the bottom of the list on the left. From the window that appears, select Physical Host Device from the drop-down menu, click on Forward and select the device from the Type and Device lists that appear. Use the Type menu to switch between PCI and USB buses, and the Device list to choose the specific device from the list that appears.
This facility is a little experimental, but you may find that many simpler devices should work without any further modification
Other ways to experiment
Virtualisation isn't the only way to try a new distribution – it just happens to be the most unobtrusive and easiest to use. But if you want to take your testing a little more seriously, running a new release on your own hardware without messing up your primary installation, there are several techniques that can help make the process easier.
Unlike a couple of commercial operating systems we could mention, most modern Linux distributions will quite happily install themselves alongside other operating systems and distributions, automatically adding their boot options to a boot menu.
To be able to do this you will need to make sure you have enough space on your hard drive. This is where things can get tricky, because the first distribution you install on your system will want to use all the available space, making further installations harder to achieve.
It's for this reason that you can save yourself a lot of hassle by forcing the first distribution you install to only use a certain amount of space, and to do this you need to use the manual installation tool.
Go compare
Different distributions use different tools to manage the partitioning process, but they all share the same basic functionality. You get to choose between an automatic installation and a manual installation. The former will usually blank your hard drive or use any remaining space in its entirety, while the latter option requires a bit more know-how.
You'll need a minimum of two partitions: one to hold all the files required by your distribution, and another for what's known as swap space. If there's enough free space on the drive, you'll able to create a new partition and define exactly how much space you want it to occupy.
You will also need to select a filesystem for the partition, and most people will use either ext4 or ext3, unless you have any special requirements
The swap partition is an area of the hard drive used as an overflow space for data shuffled from your RAM. The rule of thumb used to be that the swap partition should be twice the size of your RAM, with 2GB as an upper limit.
After creating both partitions, you will need to set a mount point for each. The main partition needs to be set to / for root, while the swap space is normally listed as linux-swap. Both will need to be formatted if your installer provided the option, and you can now let the installation progress as normal.
You'll need to go through a similar routine with any further distributions you want to install, using any remaining space to create the partitions you need for each installation.
Resize with GParted
If you're already running a distribution and you want to resize your current partition to make space for a new installation, then GParted, the tool used by most installers, can do the job – with a couple of caveats.
We've had the best results with GParted by booting from a live CD that includes the application, such as Ubuntu. This should give it complete access to your drives and enable you to resize partitions without having to worry about data access.
 Resizing is then a simple matter of selecting the partition you want to shrink (or enlarge) and clicking on the Resize button. From the window that appears, drag either the left or right border of the partition to shrink the space it occupies on the drive.
 After you've mastered the art of manual partitioning, there's another useful aspect to taking control of your data, and that's creating a separate home partition. You just need to create another partition alongside root and swap, give it a filesystem and assign it a mount point of /home.
Most installations will let you choose an existing partition to use as home and won't require it to be reformatted as part of the process. This means that any user accounts, along with their data, will appear intact and accessible from the moment you boot into the new distribution, which is especially useful if your time happens to be spread across more than one distro.
We would recommend creating a separate user for each distribution. This avoids any potential overlap in home directories and configuration files when you create a user account that already exists in a different distribution.
If you want to port your settings from one account to another, you can do that manually with the command line after you get the desktop up and running. Just copy the entire contents of one home directory to another using the cp -rf source destination command and make sure the owner and group permissions are adjusted to reflect the user who's going to access the new directory (try chmod -R username:username directory).
Even if you can't work with manual partitions, there's still the easiest option of all, and that's the humble live CD. Many distributions now include their own bootable versions, enabling you to test a distribution for hardware compatibility as well as for its design and usability. You can get a very good idea of what the final installation may feel like from a distribution running off a CD, even if the slow data read times from the optical disc may things a little slow.
Distro on a stick
This speed issue can be solved by installing any distribution you may want to try on to a spare USB thumbdrive and booting from this when you restart your machine. Creating a USB-based distribution like this used to be a chore, but thanks to the Unetbootin tool, you can create a bootable stick for all the most common distributions with just a few clicks of the mouse.
 Most distributions will include the Unetbootin package, and the application itself will likely need administrator privileges. When it's running, just point it at the location of your distribution's ISO and select the distribution version from the drop-down lists, followed by the location of your memory stick.
 Any PC from the last 3–5 years should be able to boot from the USB drive without any further interaction, but sometimes you may need to enter a boot menu from the BIOS, or change the boot order in the BIOS itself.
The end result will be a distro running from external storage with almost the same speed of a native distribution.
---------------------------------------------------------------------------------------------------
First published in Linux Format Issue 132
Liked this? Then check out 8 of the best tiny Linux distros Sphere: Related Content


+18.20.50.png)


